Sunday, November 22, 2015

Pantry Project the (not quite) Final Chapter

Following the installation of the insulation and vapour barrier, the pantry required some sort of actual wall covering.  This first required that I do a little bit of investigation into actual wall coverings possible for the space.

Drywall was totally out.  It would be heavy and cumbersome and require more professional installation than I am capable of.  Plus there's that whole mud and sanding thing and no WAY am I going through that in such a small space.

I spoke with my Dad and then I also spoke with the guys at Slegg Lumber over in Cumberland and what I ended up landing on was a very thin wall board material that would be somewhat durable and easily painted over, should the need arise.  

FYI - once the room is totally finished, including corner bead and seams, it WILL be painted before I put in the flooring.  That will be a stay-cation project for some time in 2016.  Colour not yet determined, but will need to be very light to ensure the space stays bright.

Anyhow, the hardest part of this stage was the measurements and cutting - and God bless my Daddy for his patience here because the room has some weird angles and no actual square walls!

I didn't take any during pictured because the stuff went up really fast (once the cutting was done) but I got a couple of after pictures for reference.

Look at all that shelf space available!

And here too - so much SPACE!!!
Once this was done and installed I needed to look into actual shelving options. I again sought advice from my Dad and we spent some time looking on Lee Valley' website for ideas and information,  I settled on a couple of options.  For the wall behind the freezer I elected to go with a single shelving unit (and in retrospect, I can get another set of brackets and put another set above the freezer) and for the regular walls - those seen in the second picture, I elected to install some heavy duty lumber shelving straps and brackets.

Yesterday I bought lag screws and washers and went to work. Hm.  I also needed a drill bit large enough to drill pilot holes... so the wall straps and full shelving didn't go up until today, but I was able to install the shelf over the freezer.

Definitely more space for another shelf here
Today I went and bought the needed drill bit. After a nice (but cold) walk with Jasmine, I got to work on putting up the straps, brackets and shelves. I could really put in a couple more shelves (I bought a third strap and 4 more shelf brackets, thinking I would need more bracing, but the wall space really didn't need the extra support. No matter - I will just need to purchase 2 final straps and more shelf brackets for the wall directly opposite the entry door.

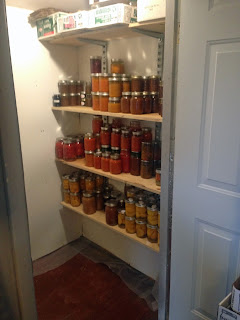
I then went to work, moving all of my canning out onto the shelves and voilĂ  - a pantry is born!

Old Mother Hubbard indeed!
As I said, no more major projects until 2016.  I will finish out the shelving for the pantry, maybe even before the end of this year, but for now, I am VERY pleased with the (not quite) completion of the project!

With love across the waters...

Thursday, October 1, 2015

Pantry Project: Part 2

So today marked another full day of working on the pantry project - today's efforts included cutting and installing the studs (my brother cut the toe board for me yesterday) and the installation of the insulation and the vapour barrier.

Things I learned today:
1)    Construction is physically demanding work - perhaps even more so than demolition.
2)    Measure once, cut twice is NOT how the saying goes.
3)    Trying to hammer in nails sideways in between 16" studs where there isn't REALLY 16" to work with is difficult.
4)    Trying to hammer in nails when you have shoulder issues (bursitis?) is not only difficult, it is painful and can cause significant numbness.
5)    Using a drill and screwing the joists together is MUCH easier
6)    Insulation is easy to cut and easy to place in the wall cavities.
7)    Vapour Barrier (plastic sheeting) is NOT easy to install.  It is slippery, it moves around when you are trying to do stuff with it.

All in all, today was another successful day – but I have to admit, my shoulders are sore enough that I have booked myself a massage for tomorrow morning – before I go hunting for whatever it is I am going to install as wall and ceiling material.

Here are some pictures of today’s efforts:
 
Getting started

First things first

Studs all in

A little improvisation at the end

Holy smokes, this stuff sure puffs up

Not perfect, but great for the first try!

Fully insulated space now!

Next up? some sort of wall covering - not drywall.  Options must be explored!


With love across the waters…

Monday, September 28, 2015

Pantry Project Part 1

I am on vacation now until October 7th (back to work day) and decided that this vacation’s major efforts would be around getting my pantry tricked out and finished. This is not without its own special set of concerns.  The pantry was (when I moved in) a closed off “porch” with a glass door that was somewhat less than secure. White vinyl siding on all four sides AND along the slope of the ceiling and a small sheet of vinyl flooring (long gone) to finish out the space and make it look pretty… well, how about pretty-ish?

Anyhow, the space became a catch all for junk and a storage space for tools, recycling and so forth… Lead up to this past spring.  I knew that I wanted to convert it into a good old old-fashioned pantry/cold storage room, but before that could happen the door would need to be filled in and the outside wall sided in order to make certain it was an actual room – and one that could be insulated and somehow sided. 

Before the kitchen windows were replaced I removed the glass door (and sent it to the dump) and Mum and Dad came up in the spring to help me fill the doorway in, and to put real cedar siding in place.

For a reference point, today is Monday… Saturday I emptied out the room and took some before shots.


Yesterday I got started on pulling off the vinyl siding.  I watched a YouTube video – which was somewhat useful in showing me what, in a perfect world, pulling off vinyl siding would be like. In my world it was dirty, coal-dusty, spider-web filled and time consuming. The good news is that I did not injure myself anywhere! How cool is that!

The first panels I pulled off were around the small door-space that Dad and I had built and insulated.  Ok, really, my Dad did most of the work and I was more like a helper (thank you Daddy!) but anyhow, this is what the first space looked like.  Not bad!


Wait… the next wall I tackled was the one up against the kitchen – an inside wall. I started to pull off the siding… and what?


Wait, what??

OK – so what I found was vinyl siding on top of asphalt siding.  I called my Mum and between us we determined it would be OK for me to remove the asphalt siding – it wouldn’t send any airborne catastrophes into my home.

Cool.

So then I pull off THAT layer to find a layer of tar paper.  Hm.  I’m having flashbacks to wall paper now.  Under the tar paper is the ORIGINAL siding… but what? What was this?


I’m still not certain if it is live – there is some sort of tester thing that could be used but my contacts at Slegg tell me that those thingies are really expensive… I took a picture and emailed it to them and they think it may be old telephone cable, but are really not certain.  The thing is that it comes up out of my crawl space and goes through a little hole in the wall into… space BEHIND a kitchen cupboard.  And, unless I want to pull out that cupboard, I’m not going to know where it goes. I’m not prepared to gut and refinish my kitchen at this point.

So… on with the siding removal.  I got the vinyl off all walls and, in the process, had to flip the breaker, pull off and unscrew the light fixture in there and then put it back onto the boards… and I found another thing that is perhaps not quite to code.  Can any of you tell me what is wrong with THIS picture?


I bought murettes today and will be replacing that monstrosity of incompetence with an up to code status in the next couple of hours.

Oh – and then there is this:


Yes, there is a wall, with actual plywood (not particle board, which I think is useless) but the studs are sideways.  When I looked, I see that the reason they are sitting sideways is that they are actually sitting on a footer that is, instead of being a 2x4, it looks more like 2x2… so the reality here is that I will need to build a wall inside this wall in order to ensure it is actually offering enough (and the right kind of) support to the roof line.  Oh – but something else to be aware of is that that “wall” doesn’t actually touch the house – nope, it sits roughly 2 inches out from the house, You can see light. You can see vinyl siding. It’s all very interesting.

At this point I actually COULD cut through and install a window (or a port-hole?) because I’m going to have to rebuild the wall properly anyhow, but I’m going to have to really think that through. I have a week.

That was where I left things last night. 


Today I had a doctor’s appointment and some running around to get done, so all I wanted to really accomplish today was getting the rest of the crud off the final wall.  I have managed to get that done and since it is almost 4PM now, I’m thinking I will call it a day for the most part. 


Now let me tell you about today’s interesting finds.

Today, while I was pulling nails from the wall where the light is I also pulled one of the original nails in the house – it had popped and wasn’t flush and with some effort (like some of the other nails) came out – I was quite surprised when I examined it.  It is rectangular, not round.  It isn’t pointed – I don’t know if that is because they couldn’t put a point on nails way back when, or if maybe the point rusted out, but I suspect the former – which means that whomever was hammering in those puppies had a HELL of a job!


The other thing I found was some crumpled up news-paper that was used to block a draft - October 23, 1954, Vancouver Sun: A couple of the adverts I saw: 50 pound bags of potatoes were $2.19 and 20 pound boxes of McIntosh apples were $1.29.  There are also some real estate ads – 4 bedroom home, full Pembroke plumbing (I don’t know what that is) an automatic oil furnace, hardwood flooring though out and an attached garage: $1,000 down, total purchase price $6,300. That was in Whalley. For reference, the AVERAGE price of a detached home in Whalley BC today is almost $400,000.

Ok – I need to think about dinner and how I am going to proceed now than I know what my project needs next…

With love across the waters…

Saturday, August 15, 2015

Deck Day!

Today was an excellent day - my parents came up to visit me, and to help me build a new deck off the back of my house. For some reference, here are a couple of “before” shots from a couple of years ago – when I first bought the house:
 
Post carpet removal.  Pre Power Washing to remove
the red paint. Pre window and new back door.

The new window and door in place.
There was indoor/outdoor carpet on the brownish-red painted concrete pad.  A couple of steps to the ground and that was really it… I removed the carpet.  I power-washed off the brownish-red paint.

Today, my parents helped me build a small (8’ by 8’) cedar deck. The materials were pretty simple, to be honest.  I reclaimed all of the 2”x6” joists that were originally in the living room (well OK, the contractors reclaimed them for me) and in advance of today’s efforts, I bought some concrete pier-post blocks (and was also given some by an old pal from high school – thanks Frank!) and some galvanized finishing nails. 

When my parents arrived, Dad and I moved some of the blocks around in order to facilitate building the initial box and then adding the inner beams to be the actual joists for the deck. This deck is “floating” – what I mean by that is that it is essentially a platform that is not attached to the house in any way. 


Initial framing done

Look at the glory of this frame!

Pier blocks all in place, frame securely held.
This baby is not going ANYWHERE!

Once we had the platform constructed and in place, Dad and I went over to Slegg Lumber and picked up the 2”x6” cedar planks that would become the deck itself.  We all went into Courtenay to have a yummy lunch at the Atlas CafĂ©.  After lunch, we placed pieces of tar paper under the beams but on top of the joists to help make the fir last a little longer) and then the cedar the planks were laid in place (and then nailed in) and then Dad routered the plank ends to ensure they wouldn’t fray off or catch an unsuspecting person (ok, it is me – I walk into things and this prevents me from getting cedar slivers in my legs) as they walk past.

Tar papered joists, spacing out and nailing the
cedar planks in place.
When all was said and done, we put my little bistro table and chairs in place and sat and had a cold cider and rest on my new deck.

Isn't it pretty?

I still have work to do on it.  I need to go through and nail down into all of the joists – we tacked each plank on and after Mum & Dad went home, I went around the outside edges and put in the second nails in all of the ends – but there should be 2 nails in each beam at each joist – and so I will still have a fair amount of nailing ahead of me. In addition, I will need to give it a very light sanding (just to smooth out any rough patches) and then stain it in order to keep the wood protected.  In addition, I will need to pick up some pot feet so that I can put my herb planters onto the deck and ensure that I don’t; cause the beams underneath to rot out.

After I had some dinner, I started canning.  I had enough ripe tomatoes to do another 8 jars of tomato sauce – to which I added a couple of jalapeno peppers to give it a little bite.  Mum brought a bag of peppers up for me (and some gloves to handle them with) for pickling and cooking with. I also got the kitchen ready for tomorrow’s canning exercises – the peaches I ordered (4 cases of them!) arrived yesterday and I need to spend the day tomorrow prepping things and then canning.  I am SO glad I picked up the pressure canner last weekend – it allows me to do 16 pint jars at a time (instead of the 8 that the water-bath canner allows) and this should help me get through those cases of peaches in record time. 

Before I can really get going on the canning, though, I need to go into town and pick up a few supplies.  Honey… and some spices… I’m going to try making a batch of spiced peaches as well!


With love across the waters…

Hot Hot Hot!

I wrote this on July 19th but forgot to hit post...

Summer here on Vancouver Island is usually warm.  We normally have a week or two of (what I feel to be) super-duper hot temperatures followed by a few days of cool and rain.  2015 has given us another summer with a long dry hot spell… Last summer we had an entire month with no rain – this year we were almost up to two months by the time the high pressure system finally broke and we got a little bit of rain… and though we have now, finally, had some rain, things still are pretty dicey – people have actually prepared “go bags” so that if they have to evacuate their homes due to imminent risk of forest fire, they can grab their bag and, well, go.  We have had two major forest fires as well as a number of smaller ones on the island this year – all of which can be attributed to humans.

Today I took advantage of a cooler morning and mowed my back yard.  First time in two weeks, and though it hasn’t been watered at all this summer, it is still pretty lush and green. I seeded most of it with drought resistant seed and that has paid off in some nice green grass, even without the watering! I have been watering my veggies, though, and also some flower pots out front.

Today has been spent in some industry. Once the lawn was mowed, I hung out some laundry on the line and then proceeded to dig out my garlic bed.  I stopped watering it about three weeks ago with the intention of digging it out last weekend – last weekend we got rain – lots and lots of rain – and so the garlic stayed in until this morning.  All dug out, it is now hanging in my shed and starting its curing process. Once cured, I’ll cut off the tops and then store the bulbs until time to use them. Once the sun is down a little (and there is some shade in my back yard) I will get back out there and pull out the snow peas and then turn the soil in both of those beds.  The bed that has the snow peas in it will be the home for next year’s garlic planting and the bed that had this year’s garlic will be the home for next year’s tomato plants… that bed, therefore, will be planted with fall rye so that I can give the soil a really good head start on adding nutrients.

My tomato plants are looking like they will  be producing another bumper crop this year – I finally picked my first three cherry tomatoes this morning (I’ll toss them in with some pasta sauce) and the Health Kick are going to be starting to ripen soon as well.  Having now pulled the last of the lettuce, I now have the space to get into the tomato bed and I can do some more reinforcement stake work.  They will need it!

I also dug out all of my onions (that was a disappointing crop!) and they are also curing in the sun right now.  The Multiplier Onions did well (and I will do them again) but the Walla Walla that I seeded gave a pretty poor crop – I will try again next year, but think I may need to do more research into soil amendments and growing conditions!

I am in the process of completing my fist canning of the year right now. The water bath canner is on the stove heating up and what I will be doing is some fresh rhubarb mixed with the last of last year’s frozen apple pieces and a small bag of last year’s left-over blueberries that I also located in the freezer.  A little bit of sugar to round out the bite of the rhubarb and the fruit compote is in a pot waiting for the jars to sterilize. It is a little warm to be canning, but the fruit is there and ready, and I need to use it or lose it!  I am shocked by this, but my rhubarb plant is still glorious and live – hasn’t gone to seed – and therefore the fruit on it is still viable for saving.  The rest will go onto cookie sheet batches and into the freezer for fall pies and crisps.  I LOVE rhubarb crisp, but more so in fall than spring!

I am thinking that, if my bean plants cooperate, I may try my hand at making dill pickled green beans – once my bean plants start to produce for me. The Scarlet Runner has blossoms now – and even a few little tiny beans have started to grow.  The Italian heritage is still not flowering, but I understand that it may still be some time before I see any produce on that one.


With love across the waters…

Monday, June 22, 2015

Storage, Organization, Raspberries, and the Front Door

Just ahead of a planned vacation day that allowed me to have a long weekend I got the flu. Yup. Long weekend be damned. This one was a funny one – well, as funny as the flu gets.  Tuesday when I arrived at work I felt a pinch in my throat that, before the end of the day had developed into a full blown nasty sore throat... Wednesday I muscled my way into the office because I was supposed to have my quarterly review – nope.  My boss decided to forego my review and home I went less than an hour later.

Wednesday and Thursday were both filled with seriously ugly fever and chills, aches and pains all over, and the requisite stuffed up sinus cavities. Medications were obtained and taken – that made getting at least a little bit of sleep Thursday night. When Friday rolled around I was still in the depths of flu misery. Today is Monday and I’ve taken one final sick day (I have to go back tomorrow) and aside from feeling stupidly weak and having wicked post nasal drip that has me coughing like a barking dog, I’m pretty much on the mend.  I did go into town again this morning to pick up some antihistamines that will help clear up the post nasal drip (and hold the coughing in check) but honestly, it is a flu virus – the only thing that will really help it heal is time and rest. I know that, and all I’m really doing now is treating the symptoms.

So since I am in rest-mode today I thought I would chronicle a few of my recent adventures in my house – I have had the pictures in place for a while, just not taken the time to document what has been done of late.

First, the new storage.  You may recall that the major living room renovation was completed in such a way that there was a new (and exciting) storage space made open to me – over the laundry part of the bathroom. Last weekend – or rather the pre-flu weekend, I opened it up to see how big it was, and to start putting stuff up there.  It is a HUGE space!

Hatch removed... 

If you look really carefully, you can see one of the original
wall-paper samples, still in place!

My little 6’ step ladder is REALLY rickety, so this highlighted to me that I need to obtain a new and much sturdier step ladder.

The organization part of today’s post is actually in reference to finally constructing the shelving/storage in the bathroom right beside the washer/drier. This was a really neat project for me (though not yet 100% complete) because I needed to think outside of my normal linear pattern. I needed to construct the whole thing in such a way that it could be completely taken apart and moved out of place in order to allow for access to behind the washer/drier AND so that if the washer/drier needed to be pulled out, it could be – but without too much effort.

The support was made in two pieces, using some 1”x4” scraps that were left over from the living room project, and a 2”x4” that had been salvaged from the false ceiling in the living room (the 2”x6” beams will be used later this summer to build a very small deck in my back yard) - it was FILTHY with dust and dirt, so first I sanded it down a little and then I wiped it off.  I haven’t decided if I will be painting or staining it, so for now, it is “raw” wood in place.

The first piece ready to put in

First and second pieces in place

Making sure it is tall enough!

Once the base was made and screwed into place, I made the top out of cedar – I love the smell of cedar and it is a wood that, even untreated, works well in a bathroom.  It is a soft wood, so will scar over time and therefore need to be pulled out and re-sanded, but in any case, it is a great wood to use for shelving.

First phase complete.
Still needs some trim!

Plus cedar oil smells amazing.

Base made, I decided it also needed a small “shelf” on top as well, to hold bottles of laundry detergent and fabric softener – and the shelf is made just like the base – to be taken apart if needed.

Building the concept... and the drill battery
ran out of charge.

Concept built

Make certain it is level BEFORE screwing into place!

Ta-da!

I’m quite pleased with the finished product – which is tall enough that I can roll my laundry cart underneath it, and I can also put a small door on it, if need be, to “hide” the laundry cart.

As of yesterday, spring is finished and we have now started summer.  Late spring brought my raspberry canes to fruit, and I picked my very first small bowl of raspberries one night after work. Two nights later I picked another, larger, bowl – and then two nights after that (last night) I picked another bowl.  Seems like I will get a bowl full every other day now – which is a Very Happy Thing, if you ask me!

Small bowl

Two Days Later!

Finally, yesterday I tackled staining my front door. This was a slow putter project that I could stop and start when tired, without trouble. The door does need another coat of stain – to even it all out – but in all honesty, it looks pretty darn good to me!  This would most definitely have been easier if I had actually taken the door off of its hinges before I started, but I didn’t think about that possibility until I had finished the first side.  When I get around to putting on the second coat, I’ll definitely take it off its hinges!


All right… it is time to take my medicine.


With love across the waters…